Instagram has a feature called Reels, which lets users make short-form films up to 30 seconds long. One of the most exciting elements of this tool is the option to add a sound to your Reels, which makes them more intriguing and engaging.
But what if you want to use your soundtrack instead of Instagram’s pre-existing alternatives? That’s where we come in! In this article, we’ll show you how to make a sound on Instagram and create audio for Reels using your recordings or music.

How to Add Your Own Audio to Instagram Story
Do you want to add original audio to Instagram story? It could be your company’s most recent commercial or an audio message promoting an upcoming sale.
Whatever the case, the Instagram story feature does not allow you to import sound. The only option is to use a third-party app.
Here’s how you can add your audio to your Instagram story:
Step 1 – Record your sound:
If you can’t afford to go to a studio, use ‘Bandlab’ to record your sound. But if the sound is pre-existing, don’t bother.
Step 2 – Create your sound:
Since you cannot import your audio into the IG database, converting your recording into a video is the best option.
Any video editor will do; just download one from the App Store (Google Play Store or Apple Store).
However, to alleviate the stress of searching for the best video editor, use “Inshot.” It is available on any app store.
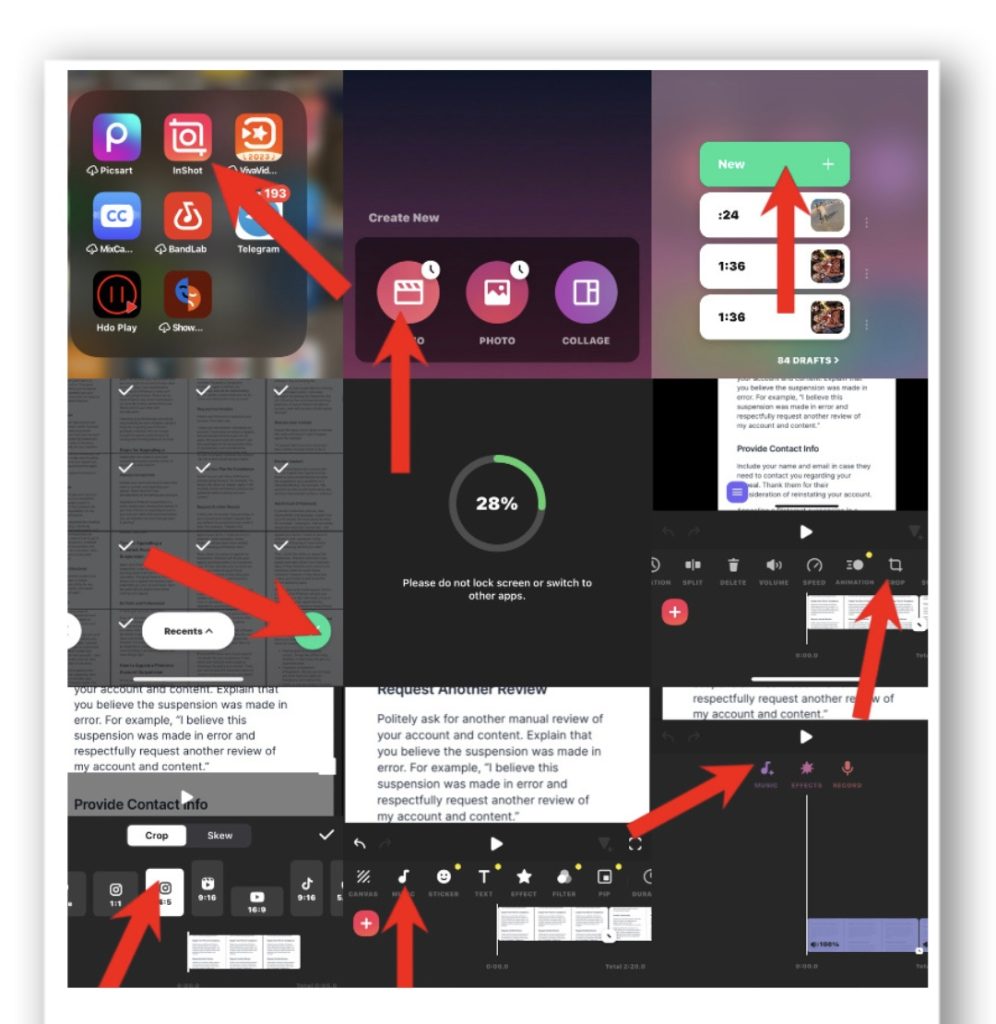
How to make a sound in Inshot:
- Open Inshot.
- Tap “VIDEO” and then “NEW.” (You can see it brings up all your videos.)
- Click on one of the videos, then click “OK.”
- Scroll down to “CROP” at the bottom of your screen.
- After that, choose the “Instagram font.”
- Tap “MUSIC” at the bottom left to add your own music.
- Three icons will appear; select the “MUSIC” icon.
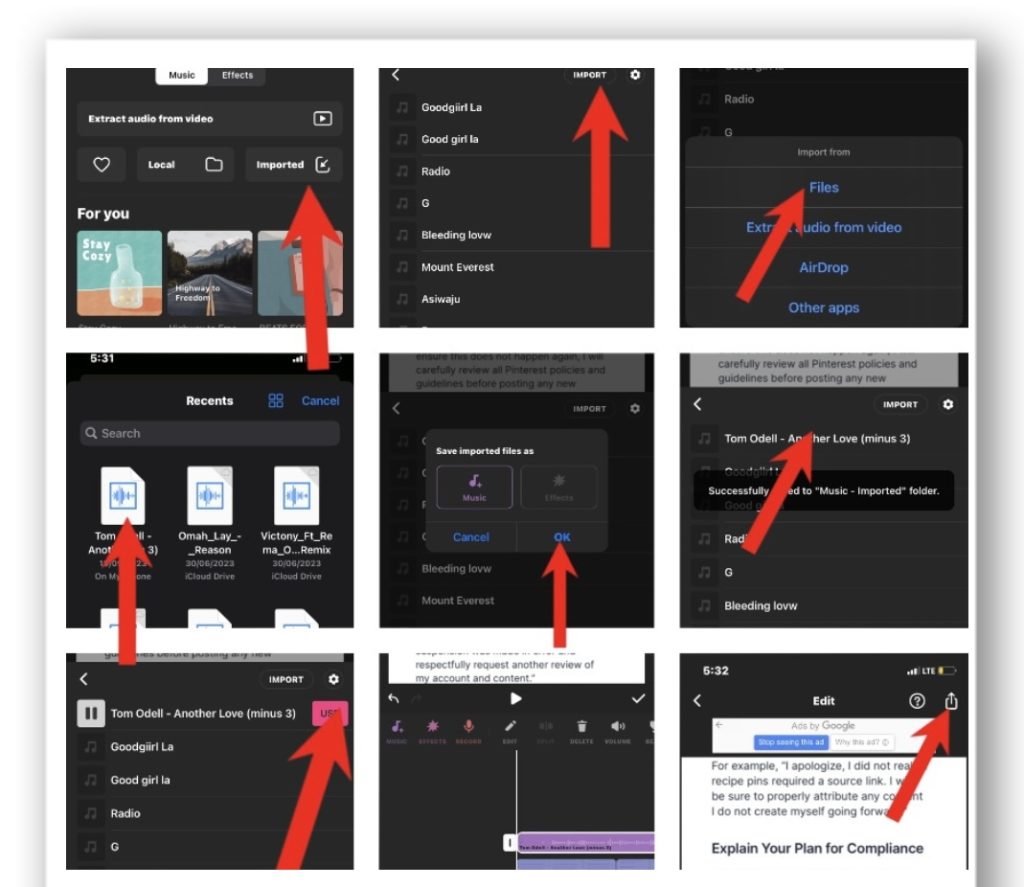
- You will see “extract audio from video,” a love icon (for your favourite audio), local, and import (for importing tracks from any source). Choose import, then choose files or other apps.
- Choose your audio and then press the ‘use’ button.
- Then, customise the track to your liking.
- Click the arrow button at the top of your screen, then select Save.
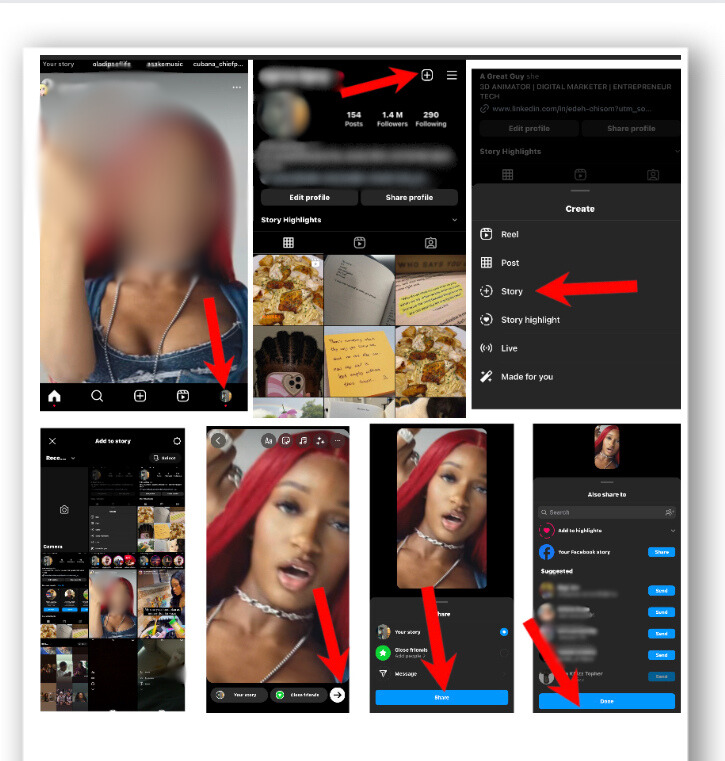
Step 3: Launch the Instagram application.
Step 4: Go to the bottom of your account and click the ‘+’ icon. Alternatively, you can go to your profile and then click on the ‘+’ icon at the top of your account.
Step 5: Select “Story.” After that, tap on the video you just made with Inshot.
Step 6: Click the arrow button at the bottom of your screen, then select “Your Story.’
Step 7: Click ‘Share,’ then ‘Done.’
How to Add Your Custom Audio to IG Reels
If you want to make your own audio on Instagram Reels, the following are the best options to use:
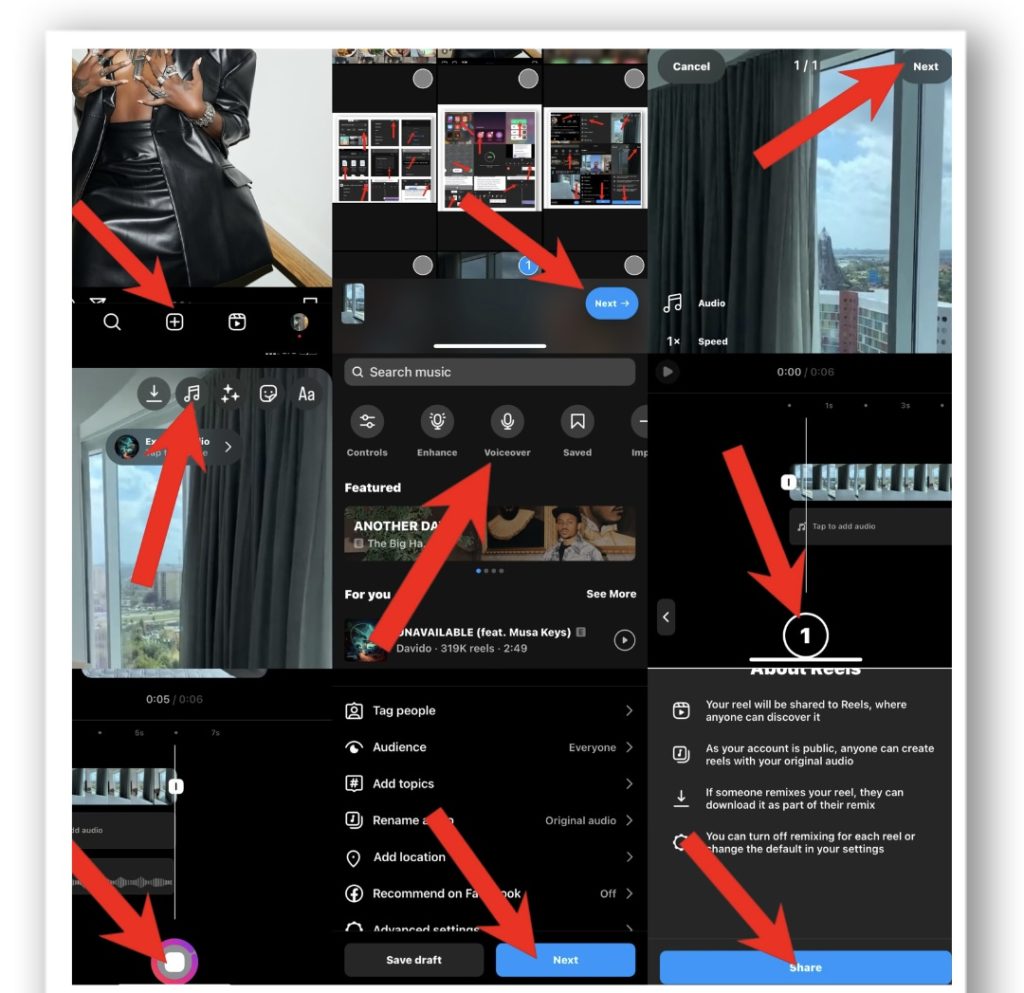
Option 1 – upload from the camera roll:
The easiest method is to upload a sound or song from your phone. Therefore, to import audio to Instagram, this is how to do it:
- Log into your Instagram account.
- Go to your profile page.
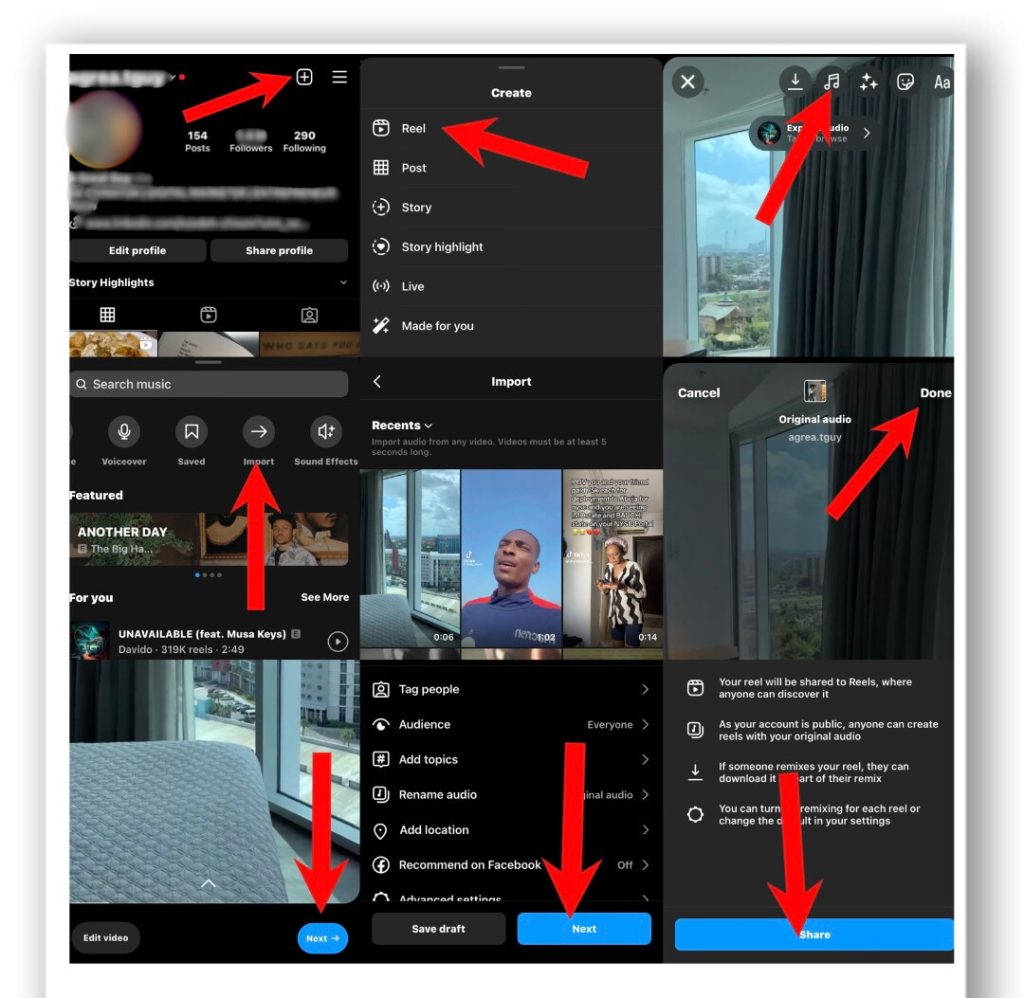
- Click the ‘+’ icon at the top of your screen.
- Choose the ‘reel’ option.
- Select the video or images you want to use.
- Click ‘next.’
- Tap on the ‘music icon’.
- Slide through and click ‘import.’
- Upload your own audio to Instagram. If you converted the audio into a video, click on the video. (The video must last 5 seconds.)
- Choose the audio segment you want to use.
- Click the ‘next’ button.
- Then, you can add a caption, tag people, preview the video, rename the audio, and more.
- Tap ‘next’ and then ‘share.’
Option 2 – Record a voiceover:
Follow these steps to record your voiceover or soundtrack for an Instagram reel:
- Make a mental note of what you intend to say.
- Open your Instagram account.
- Select the ‘plus’ sign.
- Slide to ‘Reel.’
- Choose your video.
- Click the ‘next’ button.
- Select the ‘music icon.’
- Choose ‘voice-over.’
- Tap the ‘circle’ symbol.
- Allow it to countdown from 3-1.
- Record what you want to say.
- Select the ‘arrow’ button above.
- Then, you can add a caption, tag your friends, and do other things.
- Next, click ‘next’ and then ‘share.’
Option 3 – Download from a third-party app.
Another option is to use an app such as Epidemic Sound or Storyblocks to find royalty-free music, sounds, or voiceover clips.
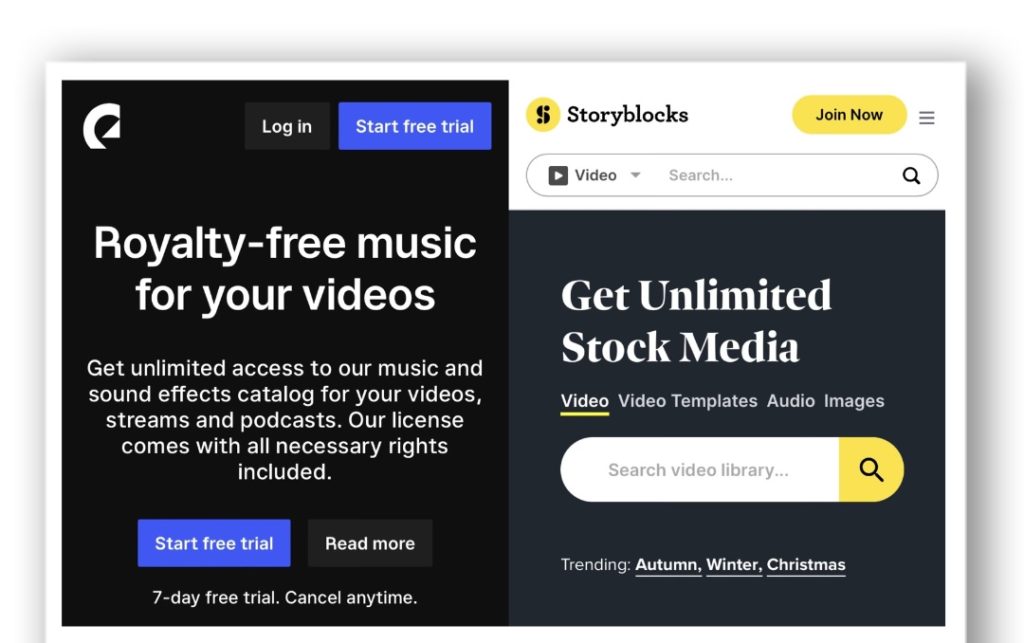
Download the audio to your phone, then follow the above steps to upload it to Instagram. To avoid copyright issues, ensure that your audio gets licenced for commercial use.
How to save your favourite sound on Instagram
Your thoughts begin to wander as you stare at the screen. You’ve spent the entire weekend cooped up inside, and the boredom of scrolling through countless feeds leaves you feeling uninspired.
That’s when you come across a post that piques your interest. The visuals are breathtaking, but the audio truly captures your curiosity. The beat is catchy, and the lyrics strike a deeper chord with you.
Then, you have a revelation: this could be the ideal audio for your social media campaign. But how do you save music on Instagram?
Fortunately, Instagram has made it simple for users to save audio recordings for later use. Here’s how you can go about it:
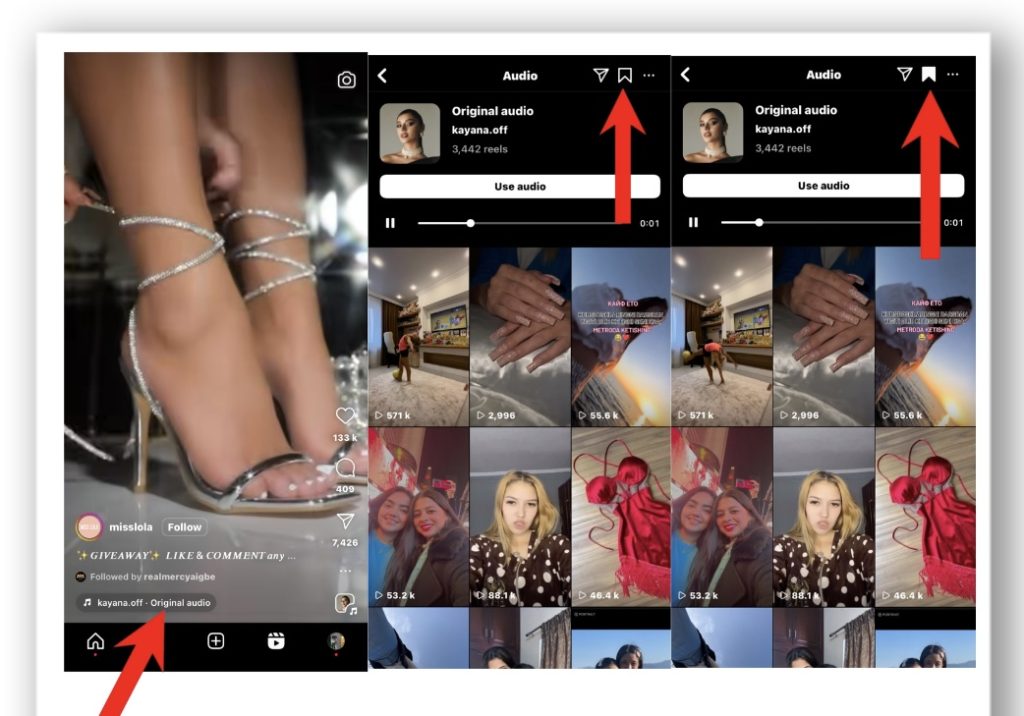
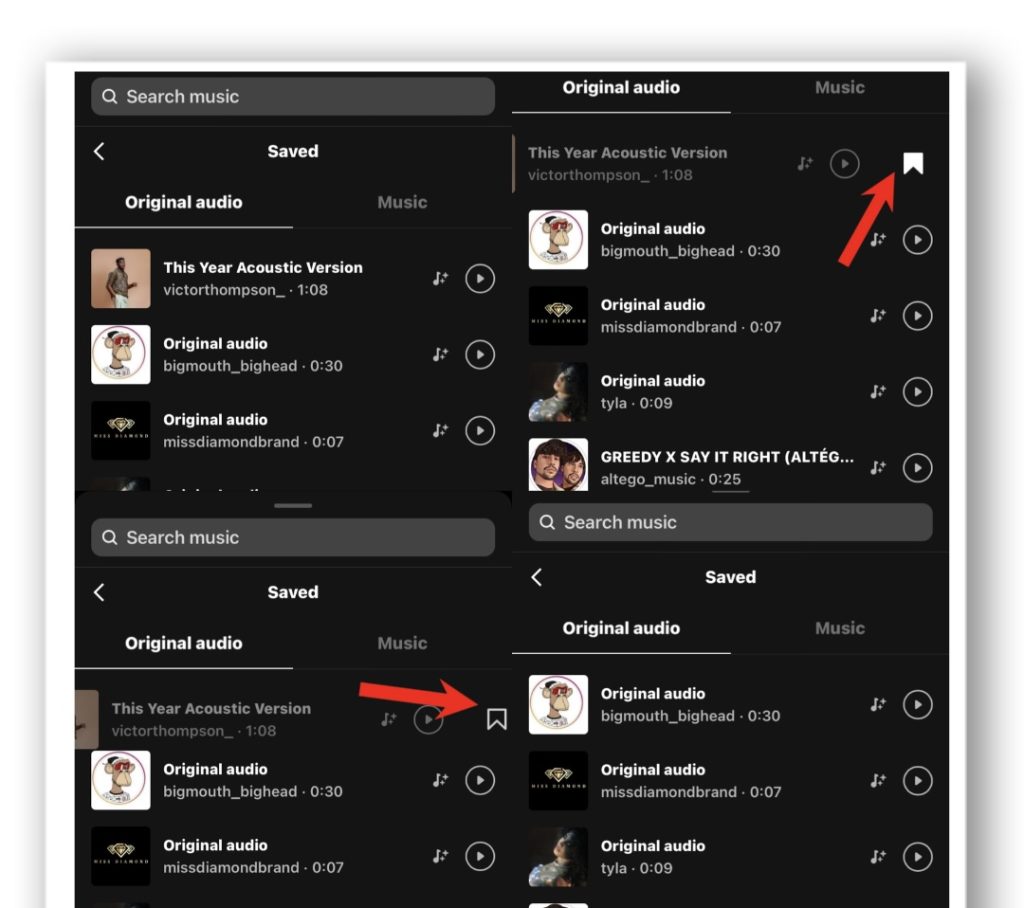
- Step 1: Navigate to the Reel with the audio you want to save.
- Step 2: You’ll see the audio title or song name below the username. Tap on that name, and the link will take you to an audio page listing all the Reels that use that soundtrack.
- Step 3: Click the “Save” button at the top of the page. (The audio gets saved in your Instagram music playlist once you save it.)
- Step 4: Incorporate the saved data.
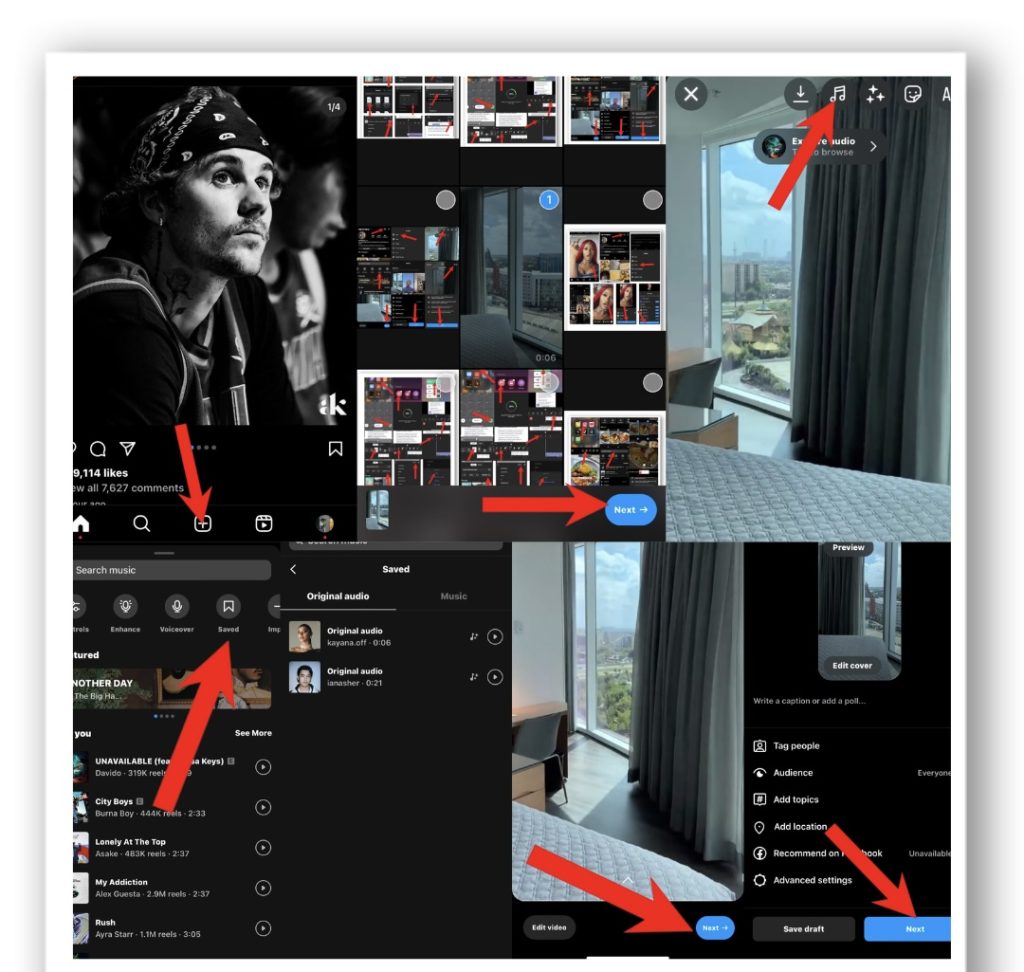
How to find saved audio
To find your saved audio, open the Reel camera. This action will load the audio library. At the top, click “Saved.” And Instagram will list all of your saved audio files there.
How to delete saved audio
Saved audio is kept in your library until you delete it. To delete it, slide the audio to the left-hand side, then tap on the ‘saved icon,’ and Instagram will remove it.
How to Rename Audio on Instagram Reel
If you want to know how to rename original audio on Instagram, follow these steps:
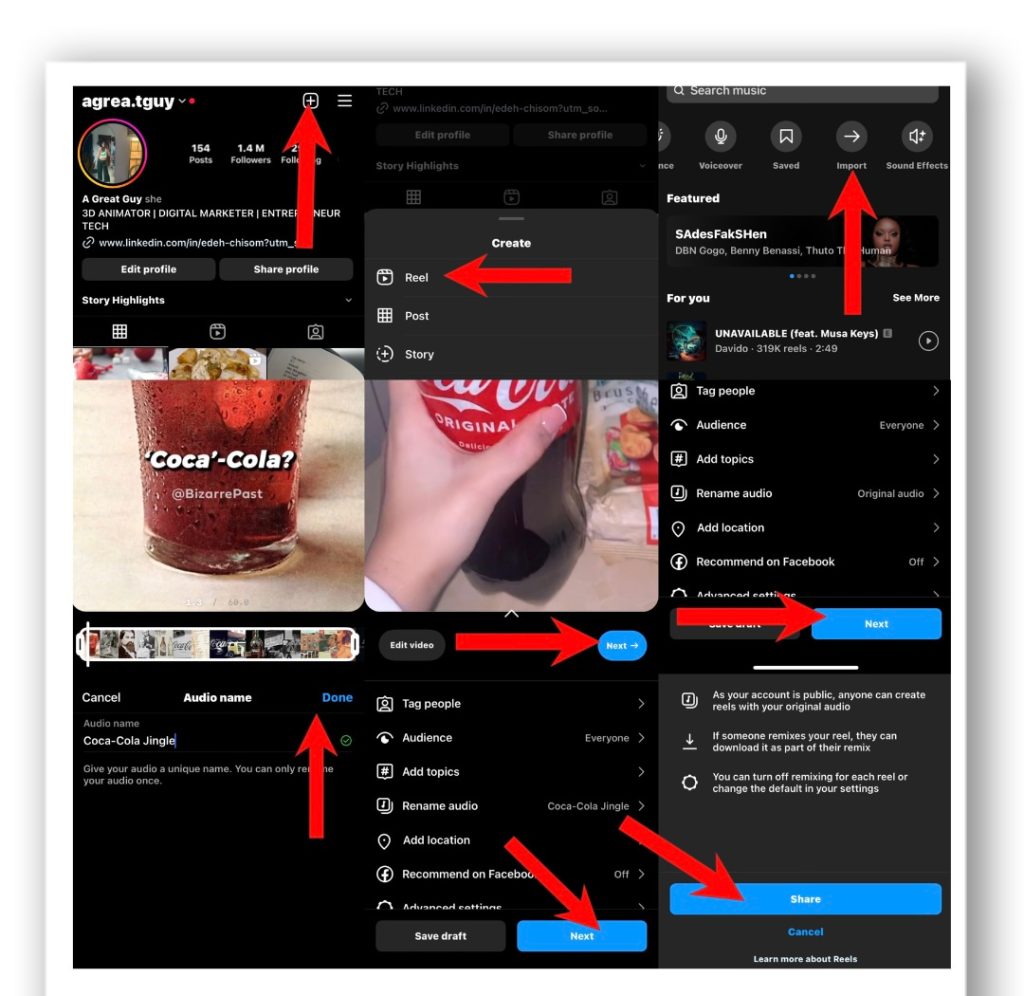
- Go to your profile and tap the ‘plus’ sign in the upper right corner of your post.
- Choose “Reel.”
- Select a video or image.
- Next, select the audio icon.
- Choose to import tracks.
- Select the audio you want to use, then click ‘Done.’
- Select the part you want to ‘Reel,’ then tap ‘Done.’
- Press the ‘next’ button.
- Select ‘Rename audio.’ Remember that you can only rename the audio once, so make it memorable. For example, you could rename “Coca-Cola Jingle” after your brand.
- After that, click ‘Next’.
- Then share it with your friends!
Note: You can only rename an audio you initially created and uploaded. You can’t rename audio from Instagram’s music library or audio from another creator.
That’s it!
Now that you know how to make a sound on Instagram, remember to have fun and be creative as you continue to explore the world of Instagram audio.
The possibilities are endless, whether you’re incorporating a catchy tune into your Reels or creating your own unique sound.
And your distinct sound could go viral and become the app’s next big hit. So, play around and have fun creating sounds!